Client-side authentication using SvelteKit and Firebase
Content
Introduction
In this article, I’ll demonstrate how to implement client-side authentication in a SvelteKit app using Firebase Authentication. This approach provides a simple and effective method for managing user authentication and navigation within your application.
With the introduction of Svelte runes in Svelte 5 (replacing stores), we’ll utilize runes to manage the authentication state client-side. Runes are powered by JavaScript signals, offering a reactive and straightforward way to handle state across the app. You can learn more about runes here.
Why Client-side Authentication?
- Faster Page Loads. Client-side authentication is particularly beneficial in Single Page Applications (SPAs), where navigation happens within the browser. This results in smoother user experiences with minimal delays between routes.
- Simplicity. While implementing token-based client-side authentication from scratch can be challenging, Firebase Authentication simplifies the process, handling much of the complexity for you.
- Offloading Load from the Server. As your user base grows, handling authentication client-side reduces the server's workload, improving scalability. In simple applications, such as a blog or news site, you might even fully serve your app as a static site with client-side rendering (CSR), leading to reduced hosting and operational costs.
Setup
Project Structure
src/
├─ lib/
│  ├─ components/
│  ├─ state/
│  │  ├─ user.svelte.ts
│  ├─ firebase.ts
│  ├─ utils.ts
├─ routes/
│  ├─ (login)/
│  │  ├─ +page.svelte
│  ├─ protected/
│  │  ├─ +page.svelte
│  ├─ +layout.svelte
│  ├─ +layout.ts
├─ app.html
├─ app.css- The project structure follows the SvelteKit standard.
- The Firebase configuration and initialization resides in
src/lib/firebase.ts - Our
userStaterune is defined insrc/lib/state/user.svelte.ts - The application has only two routes for the sake of this tutorial:
- an uporotected login route (
/) - a protected route accessible only to authenticated users (
/protected)
- an uporotected login route (
- UI components are imported from shadcn-svelte.
Firebase Auth
import { initializeApp, getApps } from "firebase/app";
import { getAuth } from "firebase/auth";

// Replace with your project's config
const firebaseConfig = {
    apiKey: "",
    authDomain: "",
    projectId: "",
    storageBucket: "",
    messagingSenderId: "",
    appId: ""
};

const app = getApps()[0] || initializeApp(firebaseConfig);

export const auth = getAuth(app);- If you haven’t alreay, create your Firebase project in the Firebase console and replace the config in
src/lib/firebase.tswith your project details. - This code ensures the Firebase app is initialized and exports the
authinstance.
Creating the userState rune
function createUserState() {
    let user = $state<User | null>(null);

    return {
      get user() { return user },
      set: (newUser: User) => user = newUser,
      reset: () => user = null,
    }
}

export const userState = createUserState();
This creates a userState rune that manages the authenticated user’s state. It’s mostly based on the official SvelteKit runes announcement. While not critical for authentication itself, this rune helps manage the user’s state across the app.
- The
createUserStatefunctions by initializes a$staterune that holds the value of the user (ornull). - We use the
getproperty to retrieve the user state when needed. - The
setandresetmeothds allow updating and clearing the user state, respectively.
Login and Logout logic
For login:
async function handleLogIn() {
    loading = true;

    try {
        await signInWithEmailAndPassword(auth, email, password);
        await goto ('/protected');
    } catch {
        loading = false;
        alert('Invalid credentials');
    }
}
For logout:
async function handleLogOut() {
await signOut(auth);
await goto('/');
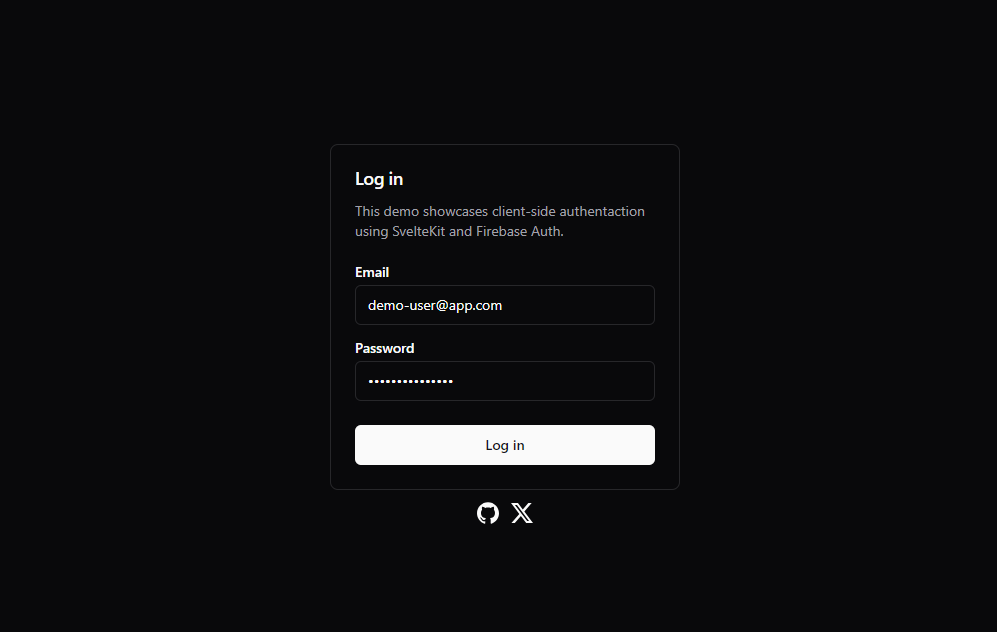
}Our login form looks like this:
Managing Authentication and User State
Finally, let’s ensure that authenticated users can access protected routes, and unauthenticated users are redirected appropriately. This logic is placed in the root +layout.ts file:
import { redirect } from "@sveltejs/kit";
import { userState } from "$lib/state/user.svelte";
import { auth } from "$lib/firebase";

export const ssr = false;

export async function load({ url }) {
  await auth.authStateReady();

  if (auth.currentUser) {
    userState.set({
      email: auth.currentUser.email!,
      name: auth.currentUser.displayName!,
      isVerified: auth.currentUser.emailVerified
    });

    if (!url.pathname.startsWith('/protected')) {
      throw redirect(302, '/protected');
    }

  } else {
    userState.reset();

    if (url.pathname.startsWith('/protected')) {
      throw redirect(302, '/');
    }
  }
}
- The exported
const ssr = falsedisables server-side rendering for theloadfunction ensuring it only runs on the client. - The
auth.authStateReadymethod waits for Firebase to determine the user’s authentication status. - The
userStaterune is either set or reset depending on the authentication status. - Authenticated users are redirected to the protected page, and unauthenticated users are redirected to the login page.
Conclusion
- Client-side authentication in SvelteKit with Firebase is fast and efficient.
- Protect routes based on the user’s authentication status directly in the client.
- Svelte’s
$staterune simplifies managing user state across your app. - Firebase Authentication makes handling login/logout and user sessions straightforward.
- While ideal for many apps, sensitive applications may still need server-side authentication for added security.